# Operate a Physical (Hardware) Network
A comprehensive guide to preparing the physical network environment. This section covers the necessary configurations for physical switches (enabling OpenFlow and sFlow) and details the system and Python dependencies required to deploy the SDN Controller.
Canonical URL: https://www.ndtwin.org/docs/ndtwin-installation-manual/ndtwin-kernel/operate-a-physical-hardware-network/
---
---
## 1. System Requirements
The system has been verified on the following configuration:
* **OS:** Ubuntu 20.04 LTS or higher (Verified on Ubuntu 24.04.3 LTS).
* **Kernel:** Generic Linux Kernel (x86_64).
---
## 2. Python Environment Setup (for Ryu)
The system requires two specific Python environments to handle version conflicts. **Ryu requires Python 3.8** due to specific library dependencies, while other components may use newer versions.
**Prerequisite:** Ensure [Miniconda](https://docs.anaconda.com/miniconda/) or Anaconda is installed.
### Step 2.1: Create the Ryu Conda Environment (`ryu-env`)
This environment runs the SDN controller.
```bash
conda create -n ryu-env python=3.8 -y
conda activate ryu-env
python --version # should be Python 3.8.x
```
> **Conda TOS Notice (required once)**
> If this is your first time using the Anaconda default channels (`pkgs/main`, `pkgs/r`), you must accept the Terms of Service before creating the environment:
>
> ```bash
> conda tos accept --override-channels --channel https://repo.anaconda.com/pkgs/main
> conda tos accept --override-channels --channel https://repo.anaconda.com/pkgs/r
> ```
### Step 2.2: Install System Build Dependencies
```bash
sudo apt update
sudo apt install -y build-essential python3-dev libssl-dev libffi-dev libxml2-dev libxslt1-dev
```
### Step 2.3: Install Ryu + Compatible Python Libraries
1. **Upgrade pip / setuptools / wheel (compatible versions)**
```bash
pip install --upgrade "pip<24" "setuptools<68" wheel
```
2. **Install Ryu (disable PEP-517)**
```bash
pip install ryu --no-use-pep517
```
3. **Pin required libraries**
```bash
# Eventlet must be <0.33 (0.30–0.31 works)
pip install eventlet==0.30.2
# Greenlet <3
pip install "greenlet<3"
# dnspython <2.3
pip install "dnspython<2.3"
```
### Step 2.4: Verify Installation
```bash
pip list | grep -E "eventlet|greenlet|dnspython|ryu"
# Expected output:
# dnspython 1.16.0
# eventlet 0.30.2
# greenlet 2.0.2
# ryu 4.34
```
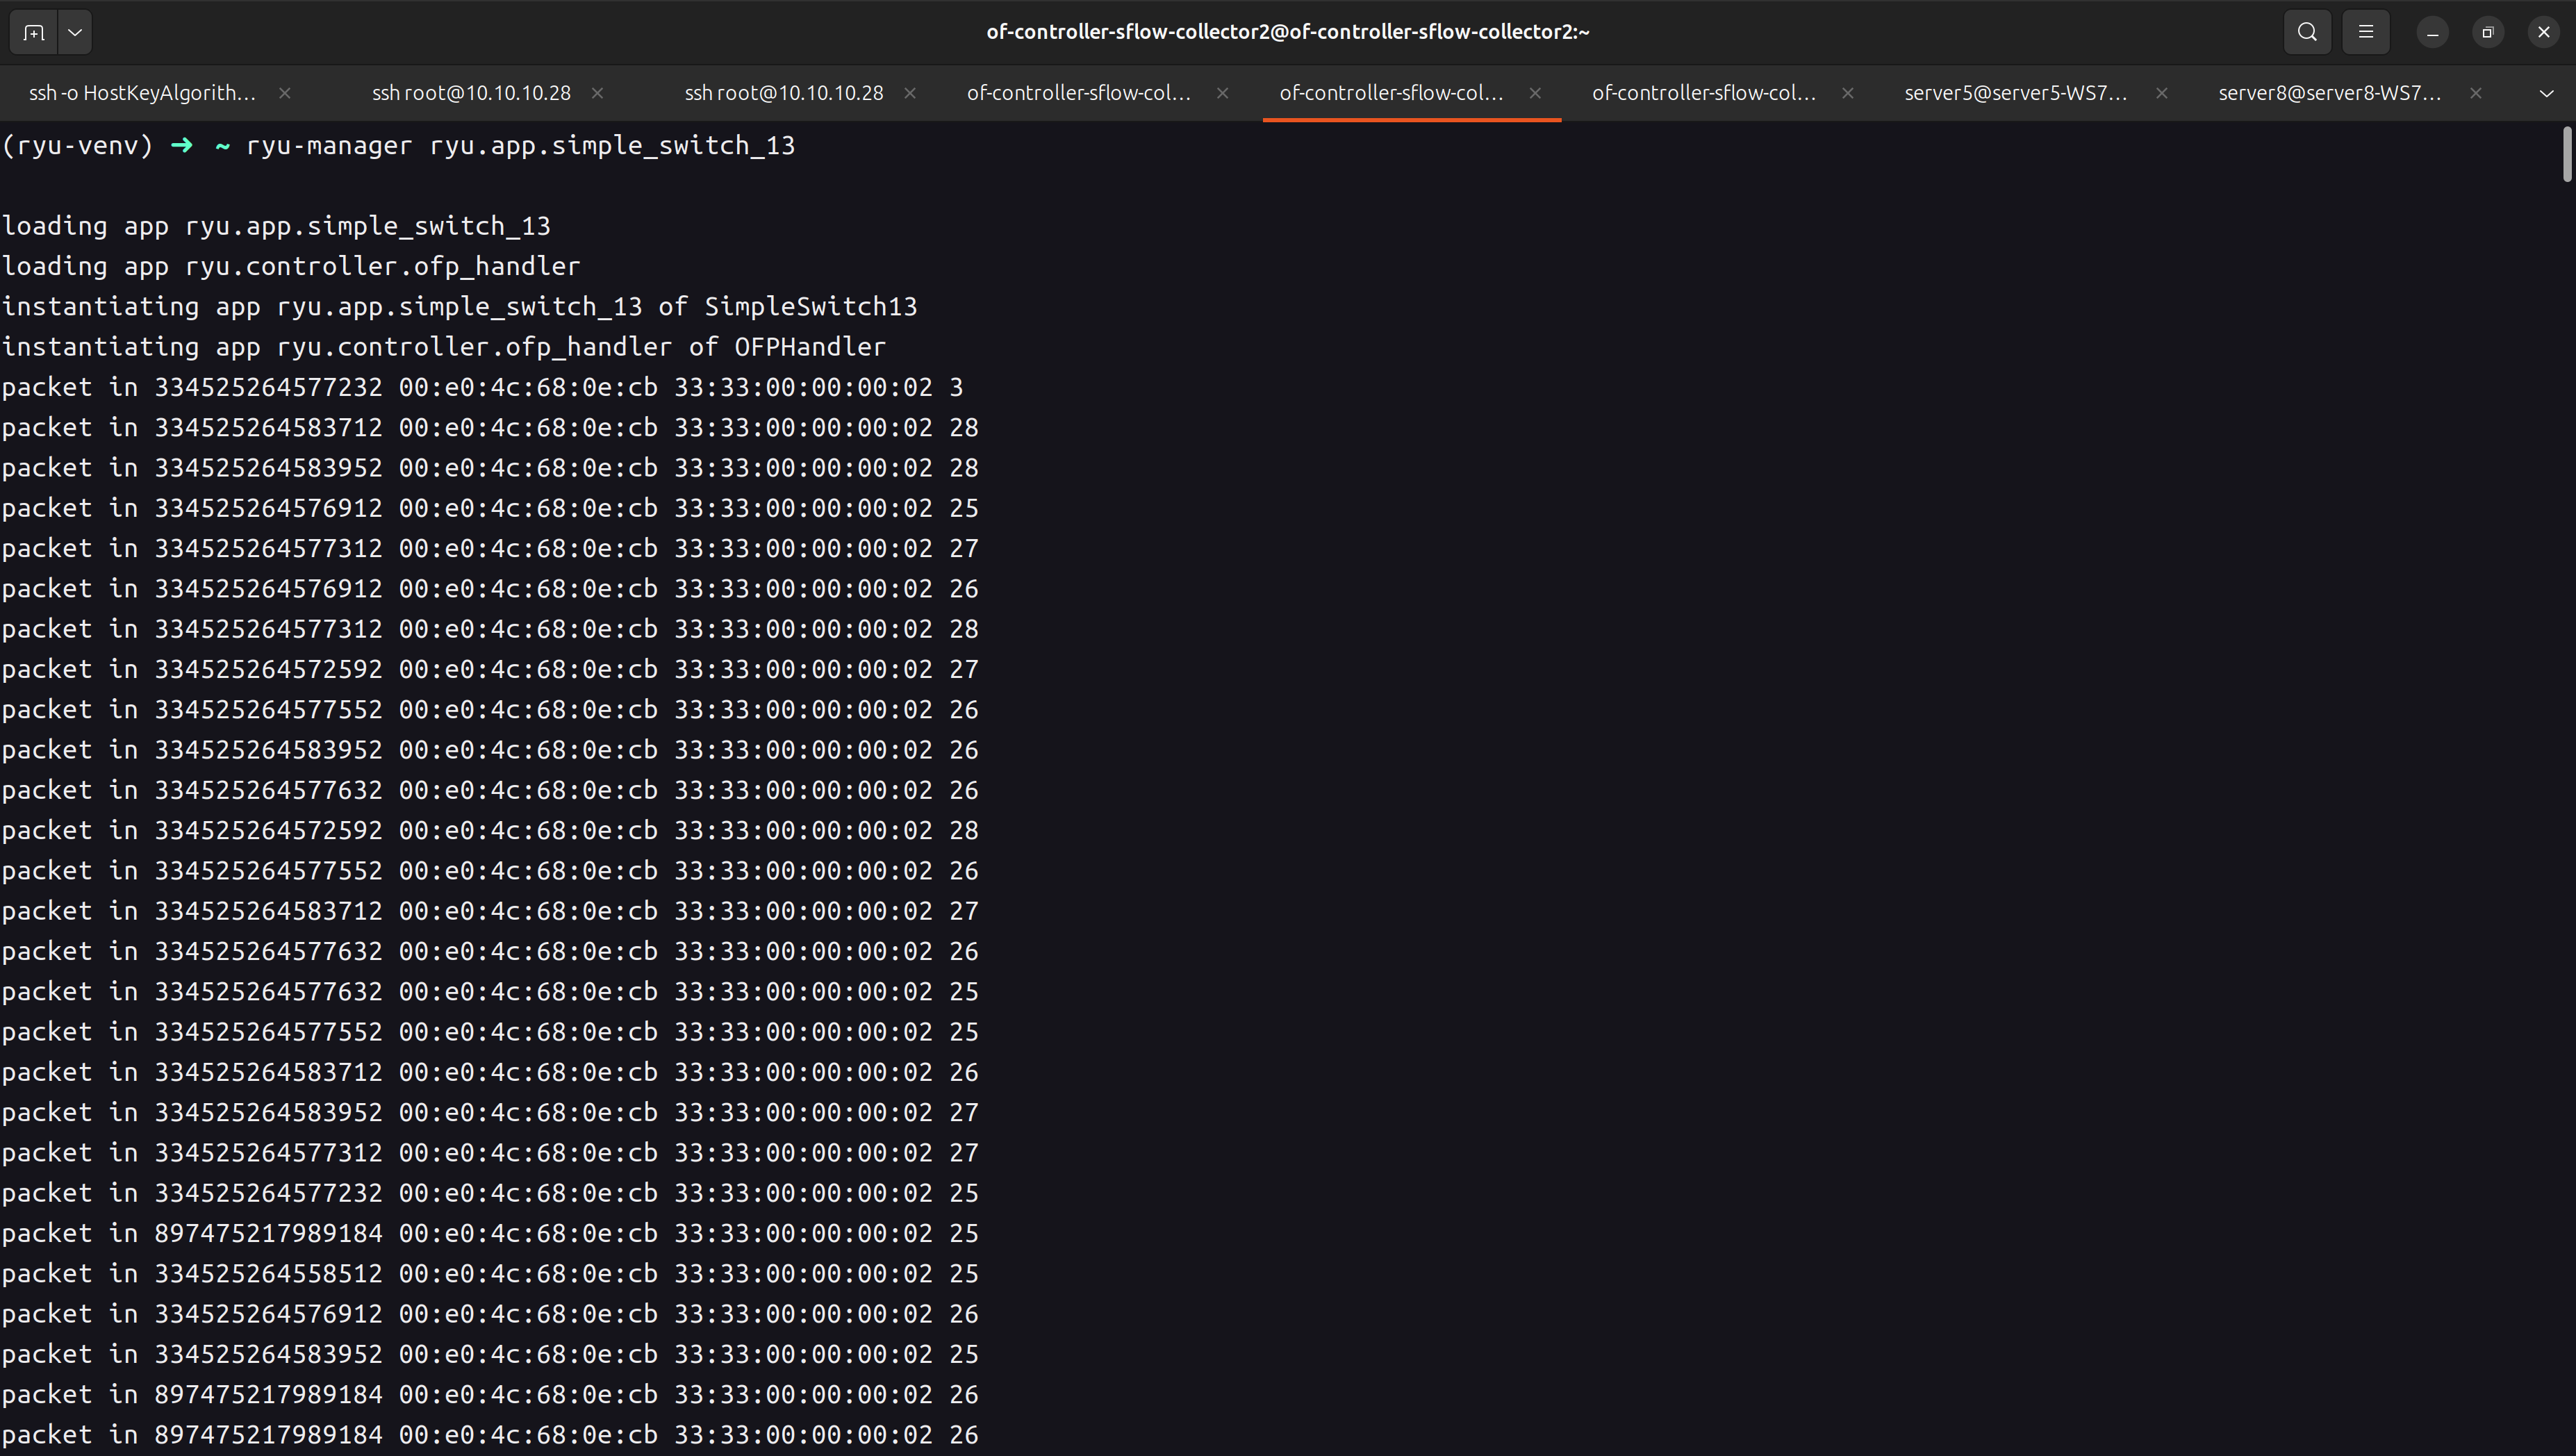
### Step 2.5: Test Ryu
```bash
ryu-manager ryu.app.simple_switch_13
```
### Step 2.6: Prepare the Customized Ryu Controller App
This project uses a customized Ryu (OpenFlow 1.3) controller to:
* Install all-destination IPv4 forwarding entries during startup (proactive routing bootstrap)
* Support static topology mode (load topology from JSON)
* Support dynamic discovery mode if the static file is missing (topology events + host learning via packet-in/ICMP)
* Compute paths and push flow entries to each switch once the topology is ready
1. **Create the Ryu App file in your Home (or any folder)**
```bash
nano intelligent_router.py
```
2. **Paste the controller code**
The full controller implementation is shown below:
Click to expand: intelligent_router.py
{{< codefile path="assets/snippet/intelligent_router.py" lang="python" opts="linenos=table" >}}
> **Note:** Before running the controller, update the parameters in `intelligent_router.py` to match your environment.
3. **Configure deployment parameters (`static_topology_file_path`, `is_mininet`, `switch_num`)**
The controller uses these parameters to decide **how to load/discover the topology** and **when to proactively install all-destination IPv4 flow entries**.
- `static_topology_file_path`: points to your topology JSON (used in *static topology mode*).
- `is_mininet`: set `true` for Mininet, `false` for physical testbed.
- `switch_num`: the controller waits until this many switches are connected before installing initial routing entries.
```python
from pathlib import Path
# (1) Static topology JSON path (update to your local file path)
static_topology_file_path = Path("/home//Desktop/NDTwin-Kernel/setting/StaticNetworkTopology_XXX.json")
# (2) Deployment mode
is_mininet = False # True: Mininet, False: physical testbed
# (3) Number of switches expected to connect before installing initial routing entries
switch_num = 10 # TODO: change to your switch count
```
### Step 2.7: Install required Python libraries for the customized Ryu app
```bash
# Graph algorithms used by the controller
pip install -U networkx
# Pin requests/urllib3 to compatible versions (avoid runtime conflicts)
pip install -U "requests<2.29" "urllib3<2"
```
---
## 3. System Dependencies Installation
You need to install build tools, network analysis utilities, and specific C++ libraries required by the NDTwin Kernel.
### Step 3.1: Update & Install Build Tools
We use `ninja-build` for faster compilation and `iperf3`/`wireshark` for traffic generation and analysis.
```bash
sudo apt update
sudo apt install -y build-essential cmake g++ make git \
ninja-build xterm curl wireshark iperf3
```
### Step 3.2: Install Required Libraries
Run the following command to install all necessary development libraries and the network emulator:
```bash
sudo apt install -y \
libboost-all-dev \
libfmt-dev \
libspdlog-dev \
libssh-dev \
nlohmann-json3-dev
```
---
## 4. Download & Compile NDTwin Kernel
We use CMake and Ninja to compile the C++ core.
### Step 4.1: Download Source Code
If you haven't downloaded the project yet, clone it to your Desktop (or preferred location).
```bash
cd ~/Desktop
git clone https://github.com/ndtwin-lab/NDTwin-Kernel.git
```
### Step 4.2: Configure controller / Simulation Platform Manager addresses (AppConfig.hpp)
Before building or running NDTwin-Kernel, update the runtime endpoints in:
`NDTwin-Kernel/setting/AppConfig.hpp`
This file defines the topology JSON path and the host IP/port for:
- **Ryu controller** (where your customized Ryu app is running)
- **Simulation Platform Manager server** (where simulation jobs are submitted)
Example:
```cpp
namespace AppConfig {
static const std::string TOPOLOGY_FILE = "../setting/StaticNetworkTopology_ipAlias4_10_HPE_Switches_smapled_by_p4.json";
static const std::string TOPOLOGY_FILE_MININET = "../setting/StaticNetworkTopologyMininet_10Switches.json";
static const std::string SIM_SERVER_URL = "http://localhost:9000/submit";
static const std::string GW_IP = "10.10.10.249";
static const std::string RYU_IP_AND_PORT = "127.0.0.1:8080";
}
```
### Step 4.3: Provide a static topology file
To bootstrap routing quickly and ensure consistent behavior, we recommend using a **static topology JSON**.
1. **Copy your topology file into:**
`NDTwin-Kernel/setting/`
Example:
- Testbed: `StaticNetworkTopology_ipAlias4_10_HPE_Switches_smapled_by_p4.json`
- Mininet: `StaticNetworkTopologyMininet_10Switches.json`
2. **Update the topology file path in `AppConfig.hpp`:**
Open:
`NDTwin-Kernel/setting/AppConfig.hpp`
Then set the correct filename(s):
```cpp
namespace AppConfig {
static const std::string TOPOLOGY_FILE =
"../setting/StaticNetworkTopology_ipAlias4_10_HPE_Switches_smapled_by_p4.json";
static const std::string TOPOLOGY_FILE_MININET =
"../setting/StaticNetworkTopologyMininet_10Switches.json";
}
```
### Step 4.4: Compile with Ninja
1. **Navigate to the project directory:**
```bash
cd ~/Desktop/NDTwin-Kernel
```
2. **Prepare the build directory:**
```bash
rm -rf build # Remove existing build directory if present
mkdir build && cd build
```
3. **Compile:**
**Note:** We do not set the build type to "Release" yet as optimization flags are pending refactoring.
```bash
cmake -GNinja ..
ninja clean
ninja -j $(( $(nproc) / 2 ))
```
---
## 5. Configure sFlow and OpenFlow on network devices (HPE 5520 example)
Below is an example for HPE 5520 (Comware CLI) where:
* Collector / Controller (your machine): `10.10.10.250`
* sFlow sampling rate: `1000`
* sFlow polling interval: `10s`
### Step 5.1: Configure sFlow (sampling=1000, polling=10s)
On the switch CLI:
```bash
system-view
# 1) Set sFlow agent address (use the switch mgmt IP / reachable IP)
# (Command name can vary slightly by release; use the switch's "?" help if needed.)
sflow agent ip
# 2) Configure the collector (your controller+collector machine)
sflow collector 1 ip 10.10.10.250 udp-port 6343
# 3) Set sampling rate + polling interval
interface range GigabitEthernet 1/0/1 to GigabitEthernet 1/0/24
sflow flow collector 1
sflow sampling-rate 1000
sflow counter collector 1
sflow counter interval 10
save
quit
```
### Step 5.2: Verify sFlow is received on the collector (using sflowtool)
On your collector/controller machine (`10.10.10.250`):
```bash
sudo apt update
sudo apt install -y sflowtool tcpdump
# Option A: decode sFlow directly
sudo sflowtool -p 6343
# Option B: just confirm datagrams are arriving
sudo tcpdump -ni any udp port 6343
```
If sFlow is working, `sflowtool` should continuously print decoded samples, and `tcpdump` should show UDP packets to port 6343.

### Step 5.3: Configure OpenFlow (point switch to your Ryu controller)
HPE 5520 OpenFlow is configured via an OpenFlow instance, then you add a controller and activate the instance.
```bash
system-view
# 1) Create OpenFlow instance
openflow instance 1
controller connect interval 5
# 2) Put traffic under OpenFlow control (global is simplest for a testbed)
classification global
# 3) Configure the controller (your Ryu machine)
controller 1 address ip 10.10.10.250
# 4) Activate the instance
active instance
save
quit
```
### Step 5.4: Check controller connection state
```bash
display openflow instance 1 controller 1
```

**Note:** STP may need to be disabled (only if your lab is loop-free)
### Step 5.5: (Optional) Configure SNMP (for switch monitoring)
If you want NDTwin to query switch status (e.g., CPU usage, memory usage, temperature), enable **SNMP** on your switches.
```bash
system-view
# Enable SNMP agent
snmp-agent
# Set an SNMP community (read-only example)
snmp-agent community read public
# (Recommended) Limit who can query SNMP (only your controller machine)
acl number 2000
rule 5 permit source 10.10.10.250 0
quit
snmp-agent community read public acl 2000
save
quit
```
---
## Installation Complete
You have successfully finished installing the environment!
To continue, please follow the [User Manual](../../NDTwin%20User%20Manual/NDTwin%20Kernel/) to try launching the **NDTwin Kernel** and get started with your experiments.
---